Top 5 Things to Look for in a Newborn Photographer

When it comes to newborn photography, there are a few key things you should look for when choosing a professional. First and foremost, a newborn photographer should have adequate training in the form of workshops and courses. When looking at the work done by other newborn photographers, pay attention to the quality of their images and prints. If the work doesn’t look crisp and clean, or if the colors are faded, lacking contrast, or too dark, move on to another photographer. The next thing you need in your search is an excellent photographer who has been vetted by others. Ask around or search online for awards won by your potential photographer – if you come across any articles about them that praise their work, that is also good news! Another thing to look for is studio set up – does the environment seem too cold or busy? Is there enough comfort provided to make your client feel welcomed?

Professional newborn photographer should have a keen eye for composition and lighting techniques, as well as the knowledge to scientifically create optimal skin tone using special studio lights. A newborn photographer who is experienced with newborns will be able remain calm, cool and collected as she soothes your baby and makes you feel right at home in the studio.

A professional newborn photographer is definitely an investment. Especially with your precious new bundle and addition to the family, it makes sense to find a photographer who will serve your needs and requirements. KatieRie likes to think of clients as family, watching as the members grow and flourish–from newborn to family sessions, year after year.

A professional newborn photographer is an artist who has mastered their art and pays special attention to the tiniest details, from the props, backdrops, headbands and layers to the professional equipment that is top-notch and above anything else. Safety is NUMBER ONE priority. Your precious bundle is never forced into any pose, but gently positioned throughout the entire session.

Milwaukee Wedding Photographer-Arynne and Kevin

Fall Wisconsin Wedding~Arynne & Kevin

When I say I love my job, I MEAN it…I LOVE my job.  How cool is it to be able to travel and connect with people from all walks of life? I’m also talking walks of MY life. Photographing old high school friends’ families and babies and being a part of BIG moments in their lives is such an honor for me–Arynne and Kevin are no exception. I’m not going to date myself as to how long I have known Arynne–but it’s a very, very long time. When Arynne reached out inquiring about wedding photography, I was SO excited to be able to work with her and her future husband.  One of my trips home to Wisco (yes, I still call Wisconsin “home”), we were able to do the engagement session and I just adored getting to know them as a couple. Just look at how gorgeous these two are!

Milwaukee Wedding Photography

Fast-forward to October and the BIG day was fast approaching; the anticipation growing. 2020 has been a crazy year for everybody, but that would not hold this couple back from celebrating their love and making it official (of course with safety a top priority).  Celebrations these days are just a little sweeter and more meaningful. The emotion and energy captured of this gorgeous day was nothing short of amazing. Be sure to show this couple some LOVE and leave a comment below!

Bride’s dress: Savy Bride

Bridesmaids’ dresses: David’s Bridal

Flowers: Bank of Memories

Reception: Western Lakes Golf Club

Milwaukee Wedding Photographer

Milwaukee Wedding PhotographerMilwaukee Wedding PhotographerMilwaukee Wedding PhotographerMilwaukee Wedding Photographer

Milwaukee Wedding Photographer

Milwaukee Wedding photographer

Milwaukee Wedding Photographer

Milwaukee Wedding PhotographerMilwaukee Wedding Photographer

Milwaukee Wedding Photographer

Milwaukee Wedding Photographer

Milwaukee Wedding Photographer

Milwaukee Wedding photographer

Milwaukee Wedding PhotographerMilwaukee Wedding Photographer

Pinterest Junkie Project 1

Confessions of a Pinterest JUNKIE

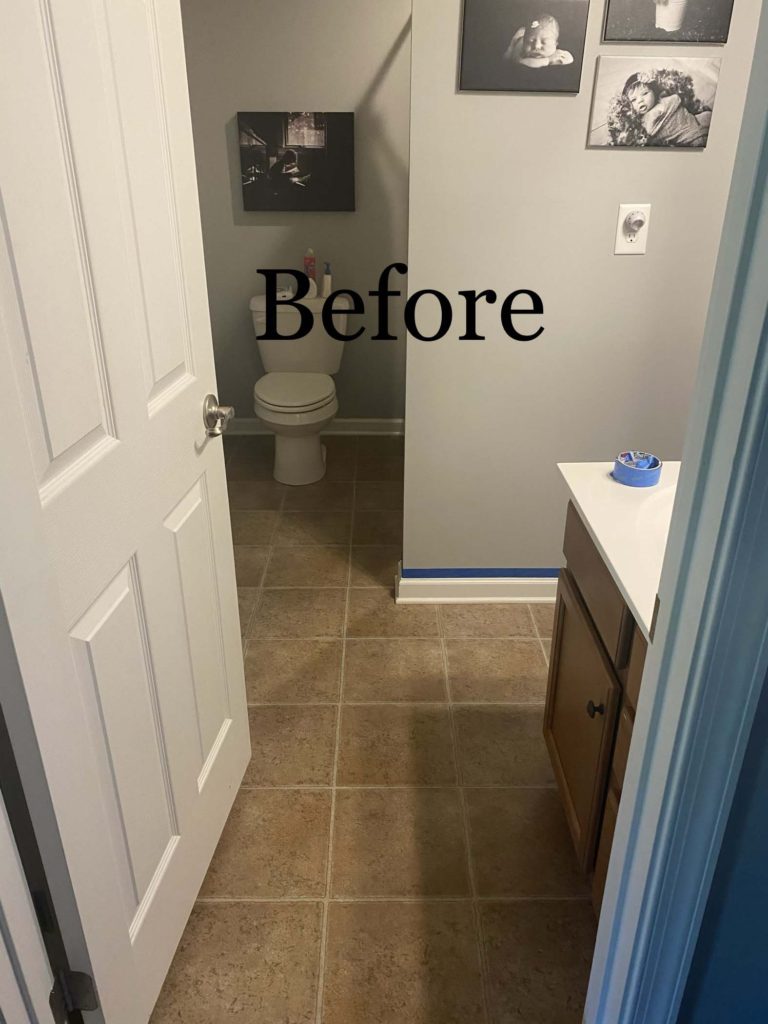
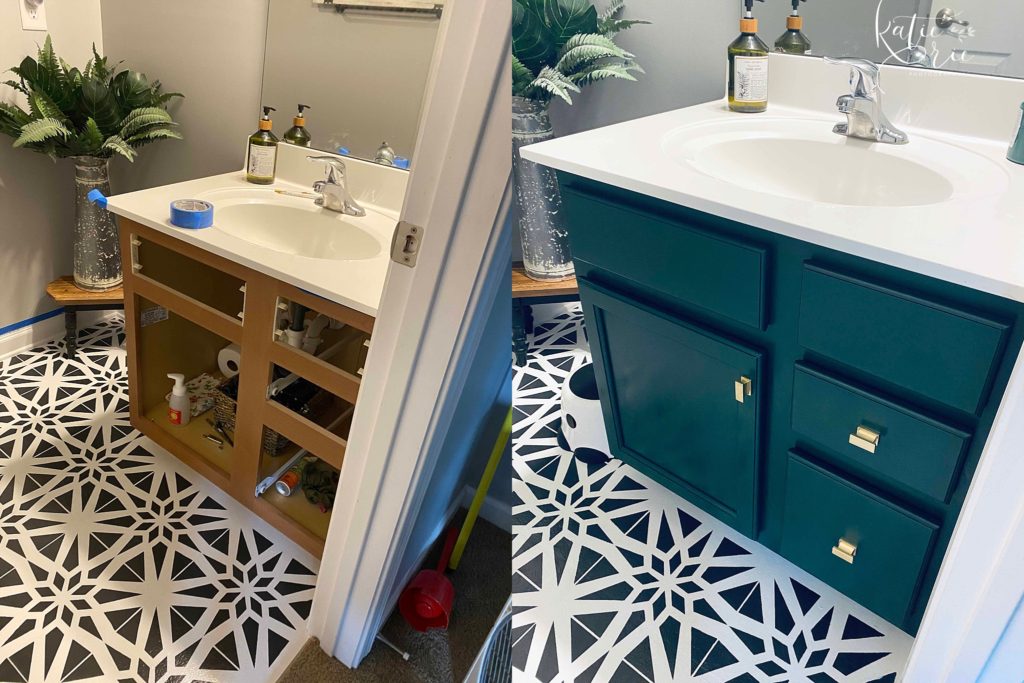
Okay, it’s no secret that I’m artsy-fartsy.  Photography, DYI projects, HGTV stalker, and Pinterest Junkie. Hi, my name is Katie and I’m a Pinterest Junkie.  Since quarantine, the hubs and I have taken to completing MANY projects around the house.  I guess since we are all sitting around staring at the same décor over and over, I wanted to research ways to redo things around the house on a budget. Enter Pinterest.  People have asked how I’ve done some of these projects, so I figured it would be best to write some posts to share what we used and how we did them. So…here’s my first one! Weeeeee! Below is the before picture of our upstairs bathroom. Kinda blah, if you ask me.  I wanted a new floor to give it some pizzaz, but didn’t want to spend oodles of money.

Pinterest Projects


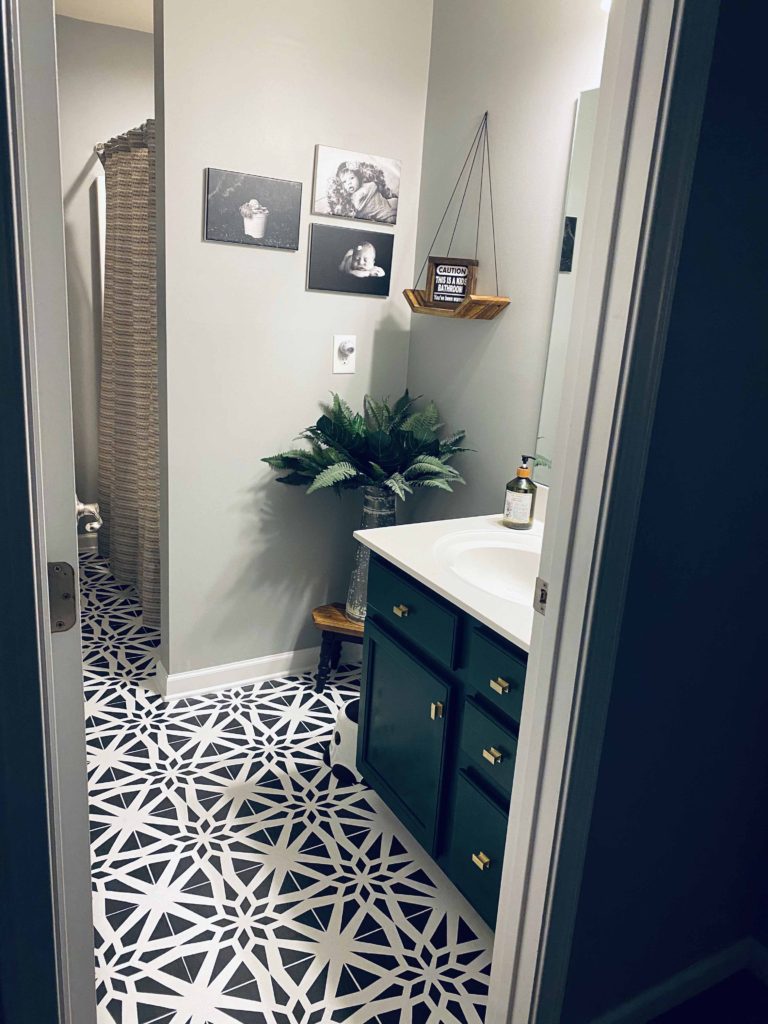
This flooring was linoleum. Completely outdated, in my opinion, and just BLAH. So Pinteret told me to paint and stencil it since the ceramic tile I wanted would cost around $1000! This project only cost around $150 for supplies and paint. That’s a STEAL! I also used fusion mineral paint (“pressed fern”) to paint the vanity (more on that later!). This is the after and I LOVE it!:

Pinterest Junkie

SUPPLY LIST

Here is the list of things used in this project.  (Disclaimer: I am an Amazon Affiliate, so I receive a small commission if purchased through my link. These are all the things that are tested and true and LOVE!)

*Paint: I used this base coat  for the floor (used for exterior and interior porch paint–so, super durable). The paint I used was white and I did two coats after heavily cleaning off the dust and grime.

*Mini Roller for the Stencil: I like this particular one because it came with replacements and a tray.

*The STENCIL PAINT I used was Rustoleum chalk paint and the color was charcoal.

*The AMAZING STENCIL I used and LOVE! I ordered two so that I could alternate while one was being washed and drying. I also cut part of one to reach the corners.

*The TOP COAT I used was heavy duty! I didn’t want to go through this whole process and have it chip! I used something that was made for cars to sit on. Now THAT’S durable.

*SMALL PROJECT PAINT BRUSHES: these are for fixing any mistakes.

*The VANITY PAINT-Fusion Mineral Paint: I’m OBSESSED with this color and this paint! I literally tried to find random things around the house to paint with this color because it’s SO pretty! Pressed fern, which is like a deep emerald color. I chose fusion mineral paint because after all the research I did, Pinterest informed me that it’s the mecca of all paints for this type of project. I actually used fusion mineral paint to paint our dressers and our other bathroom vanity as well. You don’t need a base coat, you don’t have to sand the surface (although I still lightly sanded the vanity out of habit), and there’s no top coat necessary! Ummm…need I say more?! Sign me up for all the things low-maintenance. Oh! AND it has held up very nicely! There are MANY different colors and a little goes a VERY long way! One little jar covered 90% of all our bedroom furniture!

*KNOB PULLS: I wanted something more up-to-date and trendy for this bathroom so I went for the brushed brass. I LOVE how it looks with the green!


PROCESS AND TIPS:

Pinterest Junkie
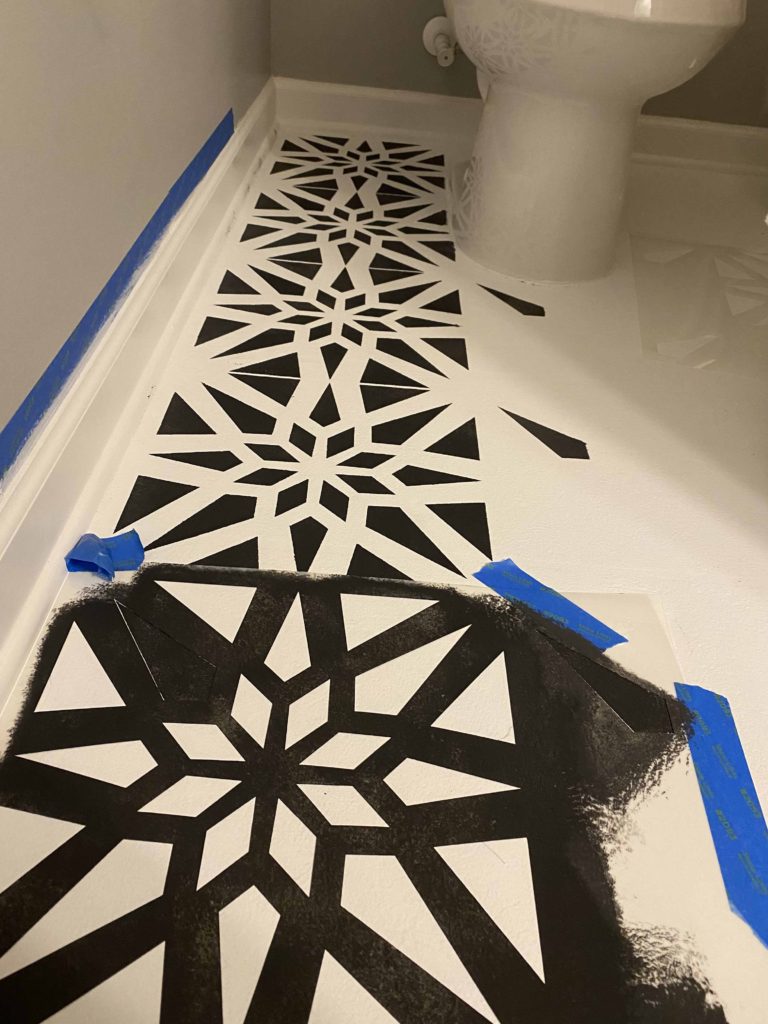
Tip ONE: When using the stencil and the mini foam roller, make sure that there isn’t too much paint on it.  Otherwise the paint will bleed under the stencil. I used the tray to roll off the extra paint. The best part about these stencils is that they line up perfectly. See how the top diamonds line up? That was from the previous stenciled block. It looks super complicated, but it’s actually really easy! I also loved that I could easily give the floor molding a little face-lift by re-painting them white.

Tip TWO: Make sure to wipe off access paint off the bottom of the stencil! I did a row and alternated the stencils (remember, I bought TWO!), and then wiped off the paint, let it dry and repeated the whole process. I also didn’t worry about mistakes because I knew once the paint dried I could touch up the area.

Tip THREE: in order to reach the corners and crevasses, I cut one of the stencils so I could match up the pieces and still be able to fit in those small areas. I waited to do this on a different day so the stencil paint would already be dry. I also did all the touch-ups during this time as well. I used tiny project paint brushes and got on my hands and knees to fix the mistakes.

Tip FOUR: Wait 24 hours for stencil to dry and then do the top coat.  Wait another 24 hours and do another top coat just to be sure.

I did the vanity after everything with the floor was completed and it was like the cherry on top! What do you think? I also ordered a black faucet to complete the look! Not bad for a transformation on a budget!

Pinterest Junkie DIY

Thinking of doing a project like this one? Let me know what you think!

Concord Newborn Photography FAQ’s

Concord Newborn Photography FAQ’s

There is SO MUCH that goes into a Newborn Photo Session, that I decided a FAQ post was in order.  It’s easy for me, the photographer, to easily overlook the details that come second-nature to me, simply because I do so many sessions.  I have to remind myself to look at the sessions–from beginning to end–through the eyes of first time clients and parents.  Here are some answers to your burning questions. (That sounded dramatic, right?! Dum, dum, DUMMMMMMM).

Best Newborn Photographer--Charlotte, NC


Why is training important?

I’m SO happy you asked! Training is SUPER important, in my humble opinion. Your photographer is handling your precious little babe who grew in your womb for nine whole months! (Well…technically TEN!). You don’t want just anyone delivering your baby, do you? You look for experience, training, qualifications…SO MANY THINGS! It’s the SAME for newborn photographers! People…listen. CHEAPER IS NOT BETTER. Can we all say that together?! I understand everyone has a budget, but also understand if you want the BEST OF THE BEST, you are going to have to pay for an experienced photographer–for someone who has the training.  I continue to learn from the best in the biz. I have invested in learning from top experts in the industry for hands-on training.  I have learned safety techniques–what to do, what NOT to do.  I didn’t just wake up one day and decide to be a Newborn Photographer.  I TRAINED to become a newborn photographer.  One of my FAVORITE photographers I continue to learn and train from is Amy McDaniel of Dewdrops Photography.  Look her up.  She’s kinda a big deal. I also have trained and continue to learn from Twig and Olive Photography (again…kinda a big deal). Why do I continue to invest in my education? Because I want to offer the absolute best for my clients. For YOU! Pretty cool, right??

Charlotte Newborn Photographer

When is it ideal to book my newborn session?

I always tell clients as soon as you know you are pregnant and are “in the clear,” that’s when to look for newborn photographers.  Why? because my schedule books up FAST. Plus I only take on so many sessions per month.  I do this because I dedicate my full attention to serving my clients. I never want to be in a position where I am overbooked and can’t offer 100% of my time to each person so they feel like they are my only client.  Are you reading this and you are in your second or third trimester? That’s perfectly fine! Hope is not lost! I always encourage people to reach out to see if there is room in the schedule. Once booked, we pencil in your due date.  A signed contract and paid retainer secures your date! I LOVE photographing newborns within the first ten days of life.

Charlotte Maternity Photography

I just booked my Newborn Session, now what?

Book your Maternity session too! I LOVE working with families throughout the journey of becoming or expanding their families. That includes documenting that beautiful BUMP. This is when we can focus on your beautiful belly and those sweet moments before baby arrives.  This is your time to pamper yourself –get your hair and makeup done. Get a pedicure and manicure! Time goes so quickly that it’s important to capture the moments leading up to the arrival of your little one.  Before you know it, you from this (above), to THIS! (Below)…

My baby was born, when should I contact you?

I always tell my clients to contact me right from the hospital. Yep! I’m on the list of people to contact right away along with grandma and grandpa, aunts and uncles.  Why? So we can schedule your session in a timely manner. I have had past clients contact me when they are settled and at home many days later– I DO NOT recommend this. Why? I can’t guarantee we can get baby into the studio during that sweet-spot!  As I said before, my sweet-spot for photographing newborns is within the first ten days of life.  This is when they are sleepiest and can be posed in those curly positions with ease. That being said, I HAVE photographed a newborn who was 20 days old just fine.  It CAN be done.  However, in my experience, I have found the average “smooth” newborn sessions happen in that first window of time. Of course, every baby is different AND due dates sometimes factor into the mix (if baby is a premie or not). These things all factor into each unique situation.

Best Newborn Photographer--Charlotte, NC

What do I need to bring to my session?

Nothing!  Well…that’s not entirely true. You need to bring yourselves and baby! How amazing is that?! You don’t have to worry about a thing except showing up on time! The studio is well equipped with props, backdrops, headbands, hats, layers up the wazoo! I actually think I might have a prop-problem.  All the things offered by the studio are specifically for newborn photography. Hats and headbands have been handmade with special fabric by photography vendors who do this for a living. And because of the craziness of Covid-19, extra precautions need to be in place. One of the things is no outside props or outfits.  Another thing is only immediate family members allowed in the studio.  Take a look at the safety measures that are taken to ensure cleanliness and safety:


KatieRie Photography Products

Do you offer products?

You bet your bottom dollar I offer products! I always say if you are investing in a photographer, invest in products as well! I am here to HELP YOU! There’s a program I utilize where I can use a phone pic of your wall or walls and I can show you different sizes and products and how they look on YOUR VERY OWN WALLS. Plus I offer a lifetime guarantee on all products purchased through me.  These are not your average products either.  These beautiful pieces are works of art that are unique–you won’t find replicas at Hobby Lobby! Let me guide you in finding products that are right for your home.  Those gorgeous images should not just sit on your computer–these need to be hanging in your home!


Phew! That was A LOT! Maybe a continuation is in order.  Are you reading this and think we are a good fit?

LET’S CHAT!